
|
Back to start |
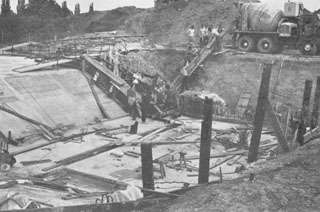
The laying of a solid concrete floor sounds fairly straightforward, but in fact the shuttering for each separate floor slab was quite complicated, for not only did it have to allow two layers of steel to stick out so that they could be enmeshed in the next slab, but also a layer of PVC was necessary to act as a water bar in the joins. This water bar is essential, because however well laid the concrete is, however sound its consistency, and however well compacted with a vibrator (which shakes it down into a solid mass, expelling air bubbles at the same time), concrete shinks while it is hardening. This shrinkage (which is of the order of about 1 in 3000) was catered for in two ways. The first way was to cast alternate bays of the floor slab and the walls, leaving narrow "in-fill" strips only two feet wide, to be cast at least seven days after the portion on either side. The second way was to complete the whole of the floor slab first, then to cast the wall bases on to the outside edges of the floor, after that the walls, and finally the corners, still with the minimum seven days interval.
The casting of the walls involved the use of a giant-sized Meccano set in the shape of the shuttering, technically known as Rapid Metal Formwork, which had been lent by Wimpey's. The standard technique for this shuttering is to take a pair of "soldiers" (upright steel supports 10 feet tall), holding them together and apart by tie bars through the thickness of the future wall. Then two panels (each 2 ft. square) are added to either side with "A" clips until another pair of soldiers is reached, and so on until the necessary length of shuttering is obtained. "Walings" (or scaffold poles) are then fastened to the top and bottom of the panels with "B" clips (to stiffen the shuttering lengthwise). The "A" clips are taken off again and used to add another row of panels on top of the first lot, and so on until the shuttering is high enough. Quite apart from this, there is scaffolding to hold the shuttering upright; scaffolding for workers to stand on, and for the vibrator to stand on; scaffolding to support the runways for the barrows carrying the concrete. It all has to be put up; and it all has to be taken down again.
|
A "ready-mix" delivery, July 1962. |
| Back to previous. | Continue to next page. |
| Back to start | |